
Hello and welcome! Today we'll walkthrough how to create a server (also know as a droplet) on Digital Ocean through Terraform. This is one of the simplest things that can be achieved with Terraform, but it illustrates understanding of basic concepts such as Infrastructure as code (IaC), Terraform itself, Terraform modules, cloud servers, basic networking and security practices.
iTip+
You can find the codebase from this tutorial here on Github.
Without futher ado, let's jump right in 🚀
iTip+
To be able to do anything at all with Terraform, we need to have it first installed on our system. The Terraform documentation has an excellent list on the different ways to install Terraform to different systems. Take a look at this guide here.
Acquire Digital Ocean Credentials
To be able to authenticate and authorize Terraform to create our sever on Digital Ocean we need appropriate credentials. Terraform requires different types of credentials depending on the Terraform provider in use. To authenticate and authorize the provider responsible for applying our configurations we will need a Digital Ocean API Token, obtained from the screen below.
iTip+
This lies at the web address https://cloud.digitalocean.com/account/api/tokens on an authenticated Digital Ocean account.
iWarning+
When creating your API Token on Digital Ocean be sure to do so with the Write scope enabled for your token. Terraform won't be able to create resources for you without this. Remember to set an appropriate expiration date as well.
Setup the Digital Ocean Terraform provider
Now that we've got our API Token for authenticating and authorizing Terraform, we can start creating our Terraform configuration. We'll start out by creating a providers.tf file. Inside this file we're going to provide the neccesary configuration to setup the Digital Ocean (digitalocean) provider.
iTip+
To learn more about Terraform providers visit https://developer.hashicorp.com/terraform/language/providers
We'll start our file with the following content:
terraform {
  required_providers {
    digitalocean = {
      source  = "digitalocean/digitalocean"
      version = "~> 2.0"
    }
  }
}
This set's up the terraform block. Within this block we configure the digitalocean provider as a required provider.
iTip+
Detailed information about the digitalocean provider can be found on it's documentation page here https://registry.terraform.io/providers/digitalocean/digitalocean/latest/docs
Next we'll configure the provider itself by appending the following code to our providers.tf file:
# Configure the DigitalOcean Provider
provider "digitalocean" {
  token = var.do_token
}
This code configures the digitalocean provider with the access token token. This is the same token we acquired from step 1.
iTip+
As a best practice, never provide account secrets as values to your Terraform configuration files as this will make them plainly visible to potential malicious use. In our code above we've provided our API key as a Terraform variable var.do_token.
There're several ways to provide the real value of our API key to Terraform.
- We could create a
terraform.tfvarsfile and fill out the value of our variable as so:
do_token=real_key_value- We could create an environment variable on our host machine with the name
TF_VAR_do_tokenand set it's value to that of our key's, as so:
export TF_VAR_do_token=real_key_valueReplacing real_key_value with the approriate value for our API key in each case.
With both of these methods Terraform will be able to find the value to our variable when it executes our configuration.
iWarning+
If you'll be providing the values to your variables via a terraform.tfvars file, be sure to NEVER check it in to version control. Always ever only make use of this file locally.
iTip+
If neither of these methods is used to pass the value to our variable, Terraform will prompt for the value for each variable on the command prompt each time it executes our configuration.
Initialize Terraform
With configuring our provider out of the way, it's time to Initialize our Terraform configuration.
We do this simply by running the following command on the command line:
terraform initDuring initialization Terraform downloads the required provider files to our configuration and initializes our backend.
iTip+
To keep this tutorial simple we will be making use of the default, Local Terraform backend. To learn more about Terraform backends visit https://developer.hashicorp.com/terraform/language/settings/backends/configuration
Setup the server deploy configuration
With Terraform initialized, it's time to actually create the configuration that deploys our server (also called a droplet in Digital Ocean lingo).
We'll start by creating a new file, server.tf. Our configuration goes as so:
resource "digitalocean_vpc" "server_vpc" {
  name     = "server-vpc"
  region   = var.do_region
  ip_range = "10.10.10.0/24"
}

resource "digitalocean_droplet" "server" {
  name     = "server"
  size     = "s-1vcpu-1gb"
  image    = "ubuntu-22-04-x64"
  region   = var.do_region
  vpc_uuid = digitalocean_vpc.server_vpc.id
}
Our code creates two Terraform resource blocks. The first one, a digitalocean_vpc resource, creates the Virtual Private Network within which our server will live on Digital Ocean.
- the
nameattribute configures the name of our vpc network - the
regionattribute through thevar.do_regionvariable, configures in what part of the world we want our vpc deployed - the
ip_rangeattribute configures the preferred IPAddress range for our network - the
vpc_uuidattribute directs our server to be placed within theserver-vpcnetwork we created as the first step
The second block creates a Terrafom digitalocean_droplet resource, and configures it with name, size, image and region attributes. These attributes are compulsory to have our server created on Digital Ocean.
As their names indicate;
- the
nameattribute configures the name of our server on Digital Ocean - the
sizeattribute configures the Processor (cpu) and Memory (RAM) combination of our server - the
imageattribute configures the particular Operating System image we'd like our server to come with - the
regionattribute configures the location in the world where we'd like our server deployed.
iTip+
As you can probably guess these attributes can have many other values than the ones we specified here. A visit to the Digital Ocean documentation will yield a more complete list of values for further use.
iWarning+
This is where you create the var.do_region variable as required by our resource blocks. Depending on the method you've chosen to pass variable values to terraform you need to create a second.
Include the following line to your terraform.tfvars file if that's the route you've chosen;
do_region=fra1Or create an additional environment variable as follows;
export TF_VAR_do_region=fra1NOTE: fra1 refers to the Digital Ocean Frankfurt datacenter. Visit the Digital Ocean Documentation to figure out possible alternative datacenters to use.
Apply the Terraform configuration
It's time to apply our terraform configuration and create our resources on Digital Ocean. To confirm that we will be doing exactly what we intend we're going to first run the terraform plan command.
The output of this command should be similar to the following;
A look below the output will show the output 2 to add, 0 to change, 0 to destroy. This means that we're all in order as we'll be adding two resources, changing none, and destroying none.
If our output matches the one pictured above then we can go ahead and run terraform apply to apply our configuration.
A confirmation screen should be presented similar to the one below, to which we should answer yes.
On succes we should get an output similar to below from Terraform;
HURRAYY!! 🎉 🎉 You've successfully deployed a server to Digital Ocean via Terraform.
iWarning+
Congratulations on creating your server on Digital Ocean through Infrastructure as Code. It's important you remember to destroy the server when it's no longer in use, to avoid unexpected billing to your payment information.
Run the terraform destroy command and confirm yes to destroy your server the moment you no longer need it.
Hope you found this post helpful! Peace out!!
Read more

Self Hosting Project (DevOps Infra from Scratch)
A comprehensive guide to building a self-hosted DevOps infrastructure from scratch using Terraform, Ansible, and Docker.
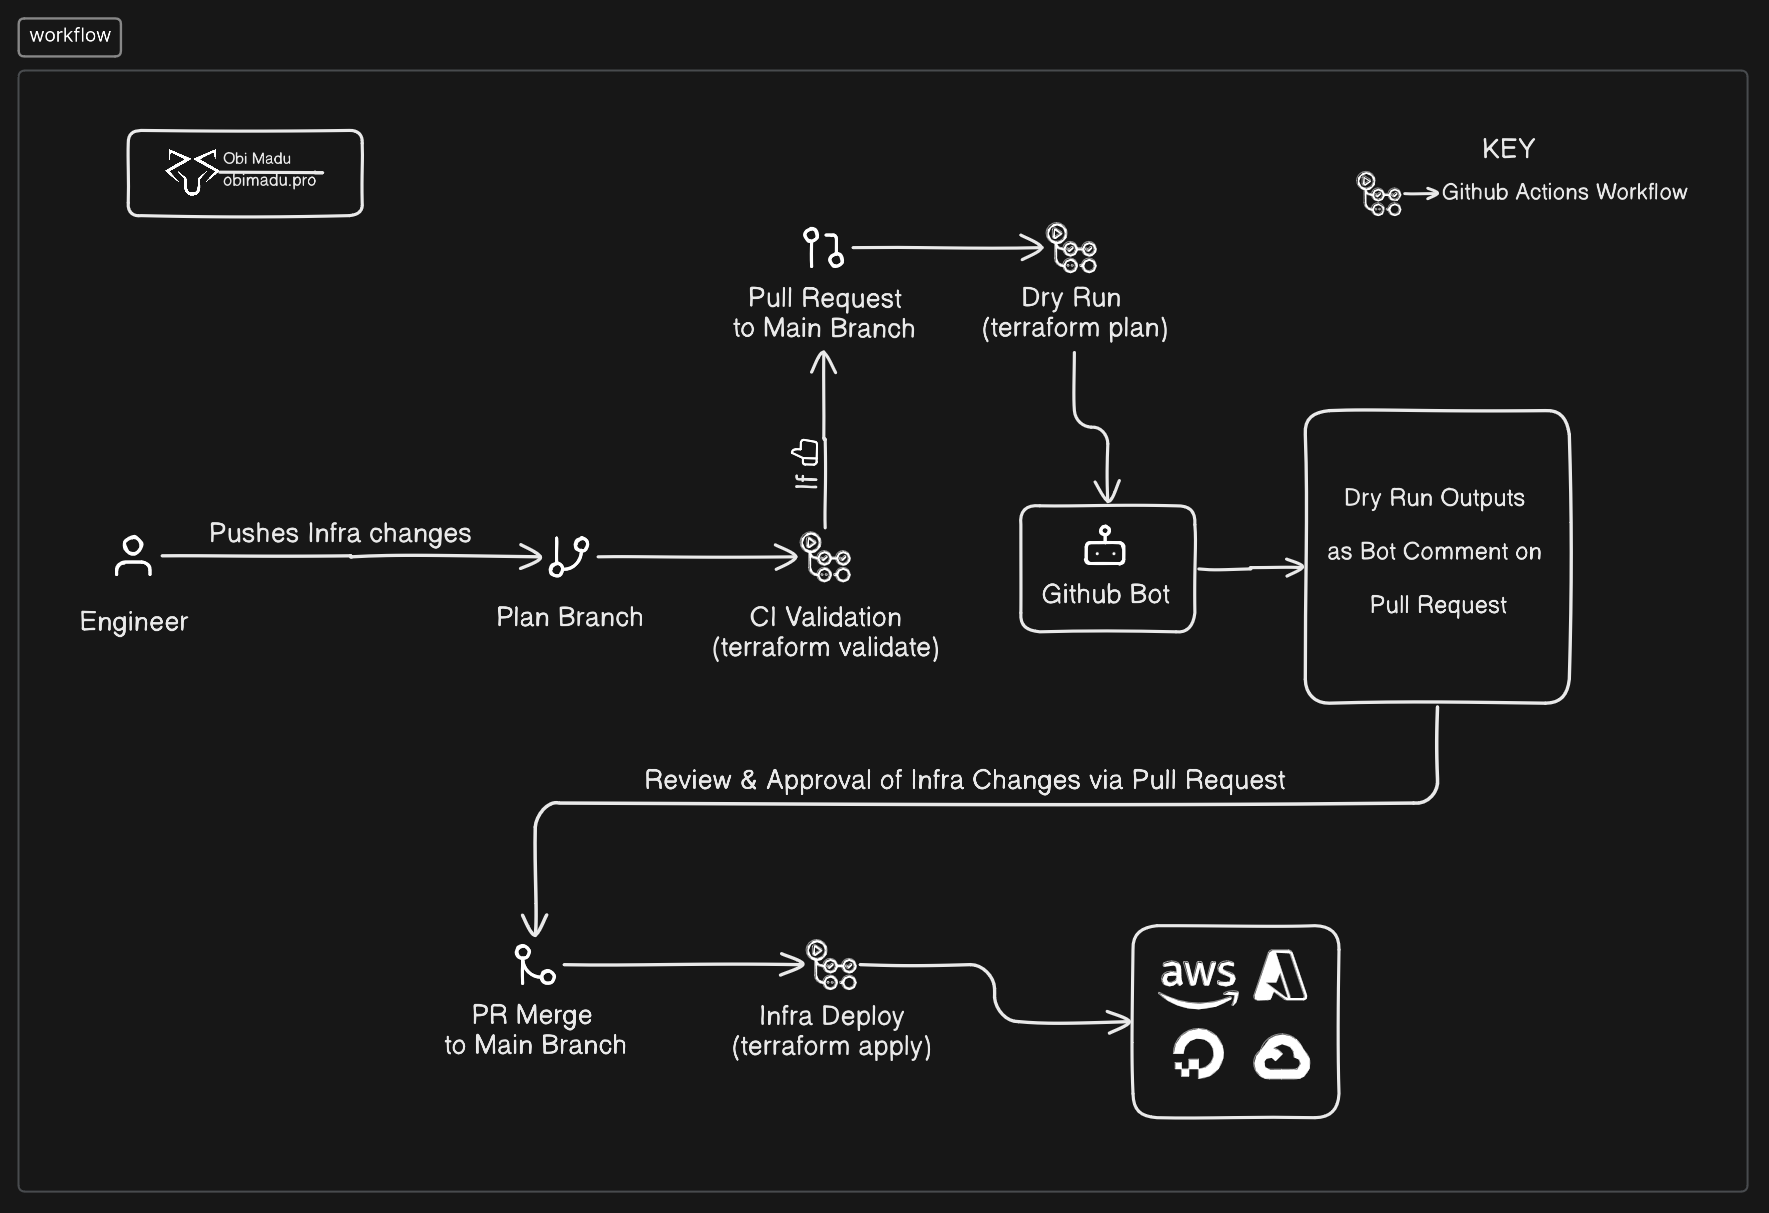
Implementing the Terraform core workflow in Collaboration, via Github Pull Requests, Actions, Bot, Environments & a Remote Backend.
Implement a collaborative Terraform workflow using GitHub Actions, pull requests, and a remote backend for production teams.
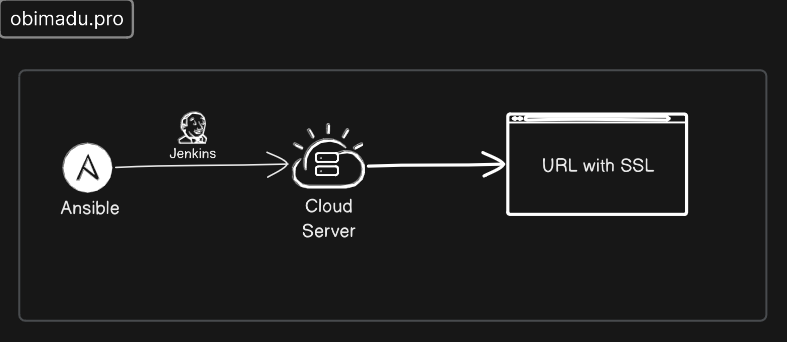
Auto-Deploy Jenkins to a remote server (with free SSL) via Ansible (HowTo)
Learn how to automatically deploy a self-hosted Jenkins server with free auto-renewing SSL certificates using Ansible.